

TL;DR:
- Layered lighting combines ambient, task, and accent lights for a more inviting and functional space.
- Proper placement and independent controls of fixtures create flexibility and a balanced room atmosphere.
- Most rooms feel flat due to reliance on single overhead lighting, which layered schemes effectively improve.
Most homeowners set up a single overhead light in a room and call it done. Then they wonder why the space feels cold, flat, or just not quite right. The problem isn’t the furniture or the paint color. It’s the lighting. One ceiling fixture floods a room with uniform brightness that washes out texture, flattens shadows, and kills any sense of warmth. Layered lighting solves this by combining multiple types of light sources to create comfort, visual depth, and flexibility. This guide breaks down exactly what layered lighting is, how each layer works, and how you can apply it in any room of your home.
Table of Contents
- What is layered lighting? The three essential layers
- Why placement and control make all the difference
- Designing with height, direction, and coverage in mind
- Common mistakes and how to avoid them
- How to plan and apply layered lighting in your home
- Why most rooms feel uninspired—and how designers leverage light
- Ready to upgrade your lighting? Explore stylish options
- Frequently asked questions
Key Takeaways
| Point | Details |
|---|---|
| Layered lighting basics | Combine ambient, task, and accent lighting for depth, comfort, and style. |
| Placement and control matter | Proper locations and dimmable controls let you create the perfect mood and adapt lighting easily. |
| Mix fixture heights | Use lights at various heights to avoid flat, harsh rooms and highlight features. |
| Avoid common pitfalls | Don’t rely on a single ceiling light; aim for intentional placement and flexible adjustments. |
| Step-by-step planning | Layer lighting deliberately for each space, starting with general illumination and adding function and focus. |
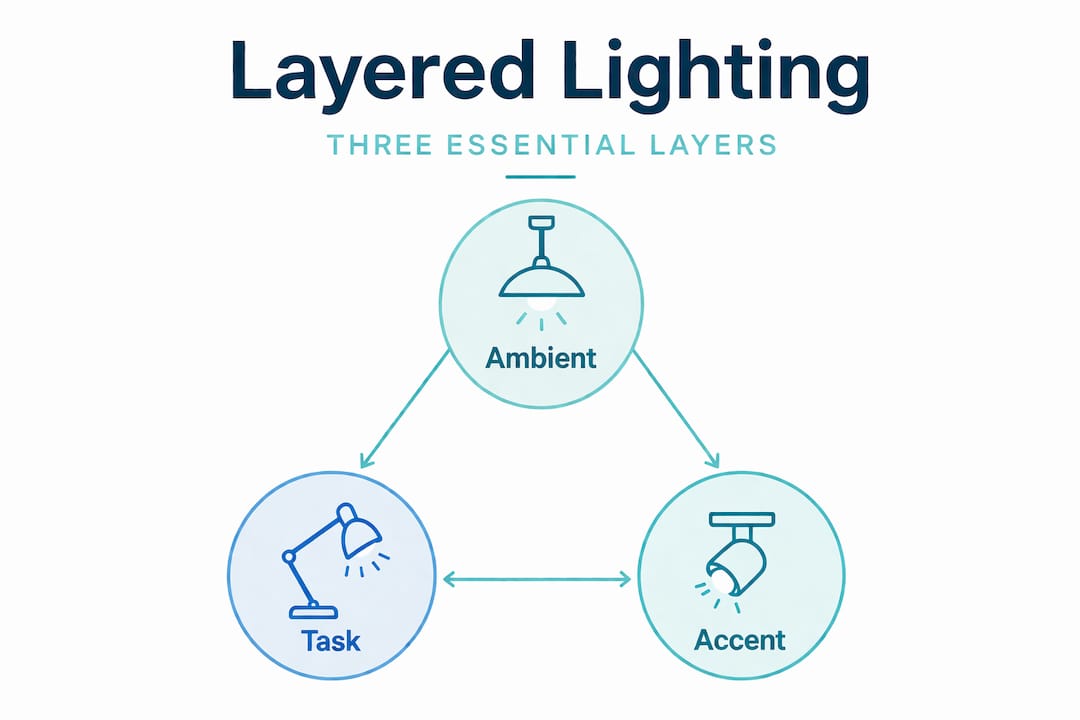
What is layered lighting? The three essential layers
Layered lighting is an interior design approach that combines multiple types of lighting in the same space to create comfort, depth, and flexibility rather than relying on a single overhead source. The three core types are ambient, task, and accent lighting. Together, they give you complete control over how a room looks and feels at any time of day.
Understanding the role of lighting in design is the first step toward making better choices. Each layer has a distinct job, and they work best when used together.
Here is how each layer functions:
- Ambient lighting provides the overall base illumination for a room. Think ceiling fixtures, recessed lights, or flush-mount lights. This is your starting point.
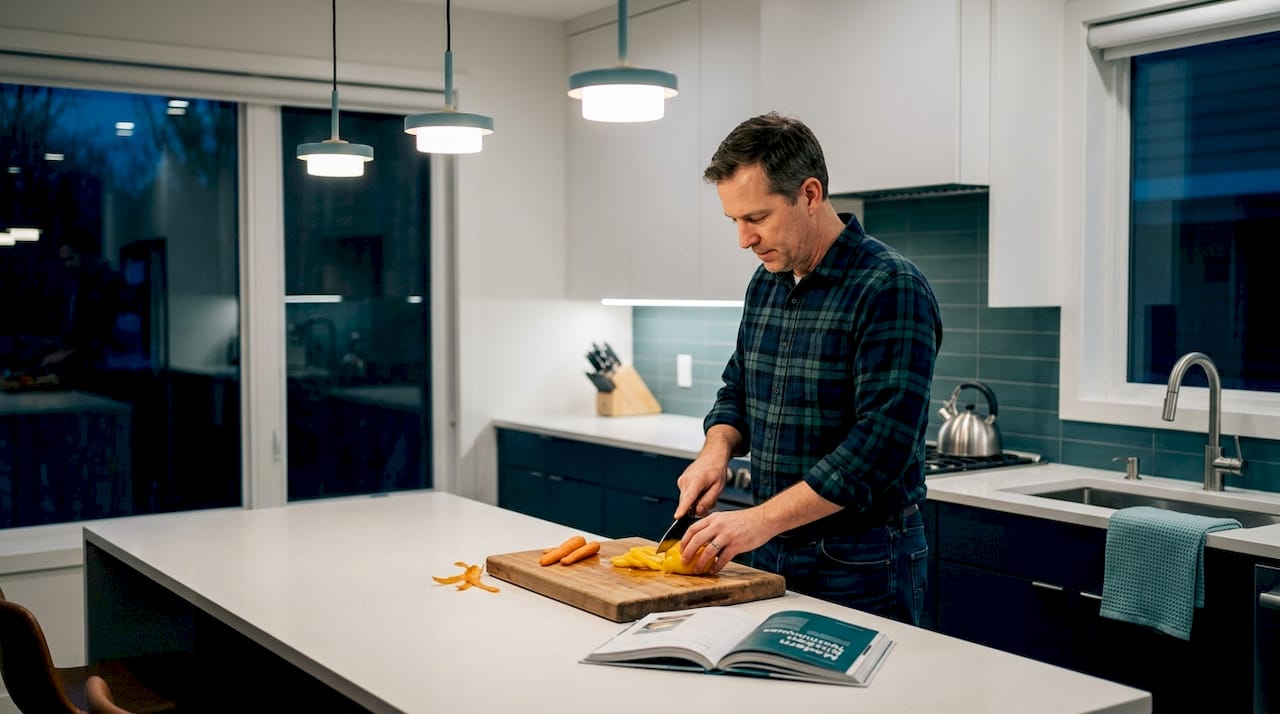
- Task lighting supports specific activities like reading, cooking, or working. Desk lamps, under-cabinet lights, and pendant lights over a kitchen island are all task lighting.
- Accent lighting highlights architectural features, artwork, or decorative objects. Wall sconces, picture lights, and directional spotlights all fall into this category.
Learning ambient lighting basics helps you understand why this layer forms the foundation of every good lighting plan. From there, exploring accent lighting uses shows you how a few well-placed fixtures can completely change a room’s personality.
| Lighting layer | Primary purpose | Common fixtures |
|---|---|---|
| Ambient | Overall illumination | Ceiling lights, recessed lights |
| Task | Activity support | Desk lamps, under-cabinet lights |
| Accent | Visual emphasis | Wall sconces, spotlights, picture lights |
The real power of layered lighting comes from how these three types interact. Ambient light alone creates a flat, institutional feel. Add task lighting and the room becomes functional. Layer in accent lighting and the space suddenly has character, warmth, and visual interest.
Why placement and control make all the difference
Knowing the three layers is only part of the equation. Where you place each fixture and how you control it determines whether your lighting actually works in real life. A reading lamp placed behind you does nothing for your eyes. A dimmer switch on your ambient light changes the entire mood of a dinner gathering.
Good layered lighting typically uses separate controls, like dimmers and zoning, so different layers can be adjusted independently for mood versus activities. This is the detail most homeowners overlook. When every light in a room is on the same switch, you lose all flexibility.
Think about how you actually use your living room throughout the day. In the morning, you might want bright ambient light while getting ready. In the evening, you want soft ambient light dimmed low, a reading lamp turned up near your chair, and accent lights highlighting your bookshelf or artwork. That kind of adaptability only happens when your lighting layers are independently controlled.
“The goal isn’t just to have enough light. It’s to have the right light for whatever you’re doing at any given moment.”
Practical placement tips to keep in mind:
- Place task lights directly at the point of activity, not across the room
- Install dimmers on ambient circuits to shift from bright to cozy in seconds
- Use smart bulbs or smart switches to create preset scenes for different times of day
- Position accent lights so they draw the eye toward features you want to highlight
- Avoid placing task lights where they cast shadows on your work surface
Pro Tip: If you’re renting or don’t want to rewire, plug-in dimmers and smart bulbs are an easy way to add independent control to any room without touching a single electrical panel.
Thoughtful arranging of lighting for style goes beyond picking pretty fixtures. It means mapping out where activities happen and placing the right light source at each spot. Following a clear lighting selection workflow takes the guesswork out of the process entirely.
Designing with height, direction, and coverage in mind
One of the most overlooked aspects of layered lighting is fixture height. Most people default to ceiling lights only, which creates a top-down wash that flattens everything below it. Real depth comes from mixing fixtures at different heights throughout the room.
Here is a practical approach to building height variety into your layout:
- Start at the ceiling. Recessed lights or a central pendant establish your ambient base.
- Add wall-level fixtures. Sconces at eye level create warmth and fill in mid-height gaps.
- Bring in floor lamps. A well-placed floor lamp in a corner adds softness and upward glow.
- Use table lamps. These sit at seated eye level, making them ideal for intimate conversation areas.
- Consider under-furniture lighting. LED strips under a console table or floating shelves add a subtle, grounded glow.
Direction matters just as much as height. Upward-facing lights (like torchiere floor lamps) bounce light off the ceiling and create a soft, diffused effect. Downward-facing lights (like recessed spots) create pools of focused light. Angled lights (like adjustable wall sconces) add drama and draw attention to specific surfaces.
Pro Tip: When lighting a room for the first time, take photos at different times of day. You will quickly see where shadows pool and where the light feels uneven, which tells you exactly where to add fixtures.
| Fixture type | Typical height | Effect created |
|---|---|---|
| Recessed ceiling light | 8 to 10 feet | Broad, even coverage |
| Wall sconce | 5 to 6 feet | Warm, mid-level fill |
| Table lamp | 2 to 3 feet | Intimate, focused glow |
| Floor lamp | 4 to 5 feet | Soft, ambient fill |
| Under-cabinet strip | Under 2 feet | Grounded, subtle accent |
Balanced coverage means no single area of the room is dramatically brighter than another, unless that contrast is intentional. Intentional focus areas, like a lit painting or a highlighted plant, draw the eye and create visual anchors. This combination of balance and focus is what makes a room feel both comfortable and interesting.
For smaller spaces, the same principles apply with even greater impact. Thoughtful lighting for small spaces can make a compact room feel open and layered rather than cramped and dim.
Common mistakes and how to avoid them
Even with the best intentions, it is easy to get layered lighting wrong. Knowing the most common mistakes saves you time, money, and frustration.
The biggest mistake is relying on one overhead fixture. It creates harsh shadows directly below it and leaves corners and walls in darkness. The result is a room that feels like a waiting room rather than a home.
Other frequent errors include:
- Skipping dimmers. Without dimmers, you are stuck with one brightness level regardless of the time of day or activity.
- Ignoring task lighting placement. A lamp on the wrong side of a desk or chair creates shadows right where you need light most.
- Using only one type of bulb color temperature. Mixing warm (2700K) and cool (4000K) bulbs in the same room creates visual confusion.
- Forgetting accent lighting entirely. Without it, a room can feel functional but lifeless.
- Over-lighting. Too many bright fixtures at the same level creates glare and eliminates the cozy contrast that makes a space feel inviting.
Placement matters in ways that go beyond just having the right bulb types. Layered schemes aim for balanced coverage and intentional focus rather than uniformly bright illumination everywhere. The goal is contrast, not just brightness.
Pro Tip: Walk through your room at night with only one light on at a time. This exercise reveals exactly what each fixture contributes and where the gaps are in your current setup.
Knowing how to select lighting fixtures for each layer prevents costly mistakes before you buy. A solid guide to lighting fixtures helps you match fixture styles to room functions without second-guessing every choice.
How to plan and apply layered lighting in your home
Now that you understand the layers, the placement principles, and the common pitfalls, you can build a lighting plan that actually works. The process is straightforward and repeatable for any room.
Layered lighting is widely taught in residential design guidance and is framed as a repeatable process for achieving depth, dimension, and adaptability across daily routines. You do not need a design degree to follow it.
Here is a step-by-step process:
- Identify the room’s primary activities. Reading, cooking, working, entertaining, and relaxing all require different light levels and positions.
- Plan your ambient layer first. Choose a ceiling fixture or recessed lights that provide even, general coverage across the room.
- Map out task lighting needs. For every activity area, identify where a dedicated light source should go. A reading chair needs a lamp. A kitchen counter needs under-cabinet lighting.
- Add accent lighting for personality. Decide which features deserve attention. A gallery wall, a fireplace, a plant, or a shelving unit can all become focal points with the right accent light.
- Plan your controls. Assign dimmers or smart switches to each layer so you can adjust them independently.
- Sketch it out. A simple floor plan sketch with fixture positions helps you spot gaps before you start buying.
- Test and adjust. Live with your lighting for a week. Notice what feels off and make small adjustments. Lighting is not a one-and-done decision.
Pro Tip: Start with what you already have. Before buying anything new, rearrange your existing lamps and test different combinations. You may already have the layers you need, just not in the right positions.
Staying current with modern lighting trends helps you choose fixtures that are both functional and stylish, so your lighting plan looks as good as it performs.
Why most rooms feel uninspired—and how designers leverage light
Here is something worth saying plainly: most rooms feel flat because their owners treated lighting as an afterthought. They chose furniture, painted walls, arranged decor, and then plugged in whatever lamp came with the apartment or screwed in a bulb to the existing ceiling fixture. Lighting was the last item on the list, not the first.
Professional designers think about lighting before anything else goes into a room. They ask how the family uses the space, what time of day it gets the most use, and what feeling the room should create at 7 a.m. versus 9 p.m. Those answers shape every fixture choice and placement decision.
The truth is that lighting’s impact on ambiance is not just about aesthetics. It directly affects your mood, your energy levels, and how comfortable you feel in your own home. Bright, cool light in the evening disrupts relaxation. Dim, warm light during a work-from-home session kills productivity. Getting the layers right means your home actually supports your daily life rather than working against it.
Layered lighting is not design jargon reserved for magazine spreads. It is a practical system that makes every room more livable. The homeowners who invest time in planning their lighting layers consistently report that their spaces feel more welcoming, more functional, and more like home.
Ready to upgrade your lighting? Explore stylish options
You now have a clear picture of how layered lighting works and how to bring it into your home. The next step is finding fixtures that match your vision and your space.

At newwayref.store, you will find a thoughtfully curated selection of modern lighting fixtures, home decor, and accessories designed to help you build beautiful layered lighting in any room. From sleek pendant lights to stylish floor lamps and accent pieces, every product is chosen with both function and design appeal in mind. Free shipping is available on orders over $50, making it easy to get started. Browse the full collection and discover lighting solutions that bring your layered lighting plan to life.
Frequently asked questions
Can I implement layered lighting in a small room?
Yes, layering ambient, task, and accent lights on a small scale adds depth and coziness without overwhelming the space. Using different fixture heights in a compact room prevents a flat look and softens shadows effectively.
Do I need to hire an electrician for layered lighting?
You can start with plug-in lamps and smart bulbs without any wiring changes. Permanent fixtures or new circuits do require a licensed electrician for safety.
How do I choose which lighting layer to prioritize?
Start with ambient lighting to establish overall illumination, then add task lighting for specific activities. Each layer serves a distinct purpose, with accent lighting added last for style and visual focus.
Why is my current lighting making my room feel harsh or flat?
Relying on one overhead fixture eliminates shadow variation and dimension. Adding fixtures at different heights and using dimmers solves both the harshness and the flatness immediately.