

TL;DR:
- Layered home lighting combines ambient, task, and accent sources to create warm, inviting spaces. Switching to LED bulbs rated at 2700–3000K can save homeowners around $225 annually. Proper verification of fixture compatibility and professional assistance are essential for safe, effective upgrades.
Upgrading home lighting is defined as replacing or supplementing existing fixtures and bulbs with layered, energy-efficient sources that improve both ambiance and function. Lighting accounts for about 15% of home electricity use, and switching to LEDs can save $225 per year on average. That saving alone makes this one of the most practical upgrades any homeowner or renter can make. The real payoff, though, comes from combining energy efficiency with layered lighting design, using ambient, task, and accent sources together to create rooms that feel genuinely inviting. This guide to upgrading home lighting walks you through every step, from planning your light layers to avoiding the most common installation mistakes.
What is layered lighting and why does it matter?
Layered lighting is the practice of combining three distinct light types in a single room: ambient, task, and accent. Ambient light provides general illumination, task light focuses on work areas like desks or kitchen counters, and accent light highlights architectural features or decor. Together, they create depth and warmth that a single overhead fixture simply cannot deliver.
Every room needs at least 2–3 light sources to feel balanced and inviting. Larger living spaces can benefit from 10 or more sources. That number sounds high until you count floor lamps, table lamps, under-cabinet strips, and wall sconces as separate contributors.
Color temperature plays a major role in how a room feels. Keeping color temperature below 3000 Kelvin produces a warm, welcoming glow. Around 2700K is the sweet spot for bedrooms and living rooms. Lights above 3000K read as clinical and harsh in residential spaces.
The most common mistake homeowners make is relying on a single overhead fixture. That approach flattens a room and creates unflattering shadows. Adding even one floor lamp and one accent source changes the entire feel of the space.
- Ambient lighting: Ceiling fixtures, recessed lights, or chandeliers that fill the room with general light
- Task lighting: Desk lamps, under-cabinet strips, and reading lights focused on specific work areas
- Accent lighting: Wall sconces, picture lights, and LED strips that highlight objects or architecture
- Color temperature target: 2700–3000K for warm, residential ambiance
- Minimum sources per room: 2–3 for small rooms, 10+ for large open-plan spaces
Pro Tip: Install dimmer switches on your ambient sources. Dimmers and timers reduce energy use and give you full control over mood at any time of day.
You can read more about building a layered lighting scheme that works room by room on the Newwayref blog.
What tools and materials do you need for a safe lighting upgrade?
Preparation prevents problems. Before you touch a single fixture, gather the right tools and check your home’s wiring basics. Most bulb swaps require nothing more than a ladder and the correct replacement. Fixture replacements go a step further.
| Tool or Material | Purpose |
|---|---|
| Voltage tester | Confirms power is off before touching wires |
| Flathead and Phillips screwdrivers | Removes fixture covers and mounting hardware |
| Wire nuts | Secures wire connections inside junction boxes |
| Insulated gloves | Protects hands during any wiring work |
| Stable ladder | Provides safe access to ceiling fixtures |
| LED bulbs (correct base type) | Replaces incandescent or CFL bulbs efficiently |
| Compatible dimmer switch | Works with LED bulbs to avoid flickering |
Older homes present a specific challenge. Legacy wiring may lack grounding or neutral wires, which limits your options for smart switch installation. Check your electrical box before purchasing any smart lighting controls. Buying first and discovering incompatibility second wastes both time and money.
Bulb base compatibility matters more than most homeowners expect. Mismatched bases or incompatible dimmers cause LED bulbs to flicker or fail early. Always check the existing fixture base type (E26, E12, GU10, and similar) before ordering replacements.
- Confirm the fixture base type before buying any new bulb
- Check whether your current dimmer is rated for LED loads
- Test for a neutral wire in the electrical box if you plan to install smart switches
- Use insulated tools and gloves for any work near wiring
- Keep a voltage tester within reach throughout the entire process
Pro Tip: Wiring changes and smart system installs require a licensed electrician. Bulb swaps and simple fixture replacements are DIY-safe, but anything involving circuit alterations is not.
For a broader look at energy-saving methods that go beyond lighting, home energy efficiency tips from Elektrotechnik Ernst cover practical upgrades worth combining with your lighting project.
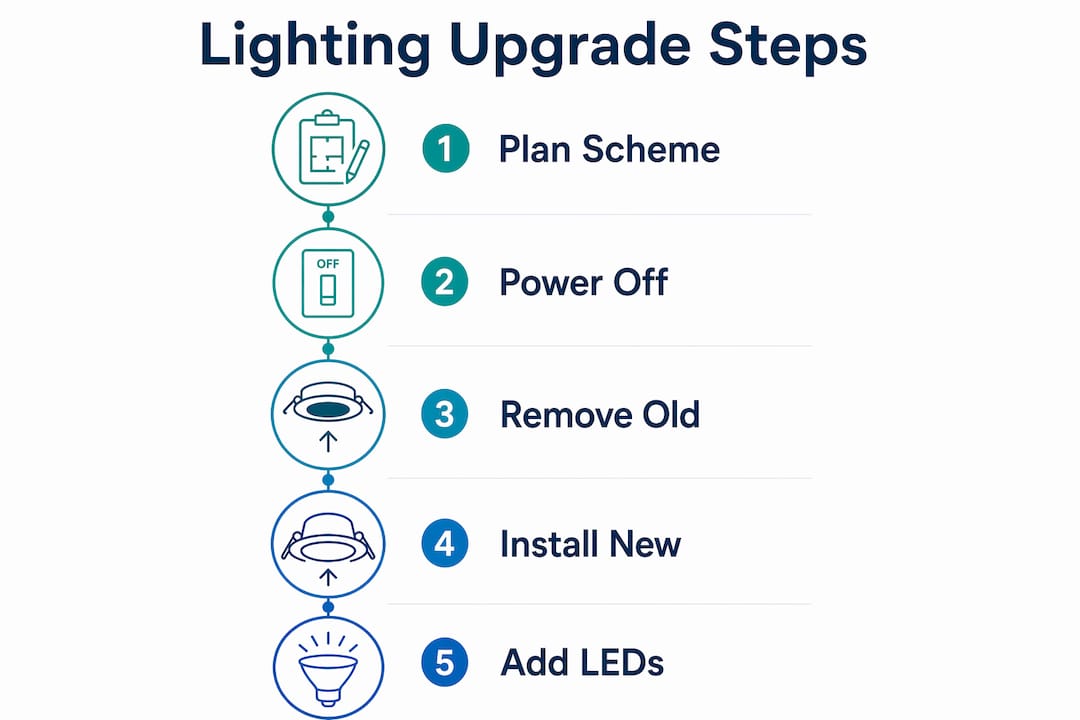
How do you upgrade your home lighting step by step?
A structured process keeps the project safe and produces better results than working room by room without a plan.

Step 1: Plan your lighting scheme
Map each room before buying anything. Identify where ambient, task, and accent sources will go. Note existing fixture locations and decide which stay, which get replaced, and which get supplemented. Use the lighting selection workflow from Newwayref as a reference for matching fixture types to room functions.
Step 2: Turn off power and verify
Go to your circuit breaker and switch off the circuit for the room you are working in. Then use a voltage tester on the fixture wires before touching anything. Never assume the power is off based on the light switch position alone. A voltage tester costs under $20 and eliminates the most serious risk in any lighting project.
Step 3: Remove old bulbs and fixtures carefully
Let bulbs cool completely before removing them. For fixture replacements, unscrew the canopy or cover plate and gently pull the fixture away from the ceiling or wall. Support the fixture with one hand while you disconnect the wires. Take a photo of the wire connections before disconnecting them. That photo saves significant time during reinstallation.
Step 4: Install new fixtures and connect wiring
Match wire colors: black to black (hot), white to white (neutral), and green or bare copper to ground. Twist wire nuts clockwise until firm. Tuck wires neatly into the junction box before mounting the fixture. Loose wires cause shorts and create fire risk.
Step 5: Install energy-efficient LED bulbs
Choose LEDs rated at 2700–3000K for living rooms and bedrooms. Use 3000–4000K for kitchens and bathrooms where clarity matters more than warmth. Confirm the bulb base matches the fixture socket before inserting. Finger-tighten only. Over-tightening cracks the base.
Step 6: Test and adjust
Restore power at the breaker and test every new fixture. Check that dimmers respond smoothly without flickering. Bounce light off walls and use lower-level fixtures to soften shadows and add visual comfort. Adjust lamp placement until the layered effect feels balanced.
Lighting is not just about visibility. The right combination of sources, color temperatures, and placement shapes how a room feels to everyone in it. A well-lit room invites people to stay. A poorly lit one drives them out without their knowing why.
What are the most common lighting upgrade mistakes?
Most problems in a lighting upgrade come from skipping compatibility checks or taking shortcuts during installation. Knowing what goes wrong helps you avoid it.
- Wrong bulb base type: An E12 bulb in an E26 socket either does not fit or creates a loose connection. Always verify the base before purchasing.
- Incompatible dimmers: Older dimmers designed for incandescent bulbs cause LED bulbs to flicker, buzz, or fail early. Replace them with LED-rated dimmers.
- No grounding or neutral wire: Smart switches require a neutral wire to function. Homes built before the 1980s often lack one. Verify before buying any smart lighting controls.
- Relying only on overhead light: One ceiling fixture creates flat, unflattering light. Add floor lamps, table lamps, or wall sconces to build depth.
- Bare or exposed bulbs: Unshaded bulbs create glare and visual discomfort. Choose diffused or frosted bulbs, or use fixtures with shades and diffusers.
Pro Tip: Always check bulb and dimmer compatibility before installation. A five-minute check prevents flickering, early burnout, and the frustration of returning products.
Smart lighting solutions add another layer of complexity. If you want to explore connected controls, the Newwayref guide on smart lighting for modern homes explains what to check before you buy.
Key Takeaways
The most effective way to upgrade indoor lighting is to layer ambient, task, and accent sources using LED bulbs rated at 2700–3000K, while verifying fixture and dimmer compatibility before installation.
| Point | Details |
|---|---|
| Layer your light sources | Use ambient, task, and accent lighting together for depth and warmth in every room. |
| Choose the right color temperature | Stay in the 2700–3000K range for warm, residential ambiance that avoids harsh light. |
| Check compatibility first | Verify bulb base type, dimmer ratings, and wiring before purchasing any new fixtures or controls. |
| Switch to LED bulbs | LED lighting can save $225 per year and uses significantly less electricity than incandescent bulbs. |
| Call a licensed electrician when needed | Wiring changes, circuit alterations, and smart switch installs require professional work for safety and code compliance. |
What I’ve learned after years of lighting upgrades
The advice that changed how I approach every lighting project is simple: stop treating overhead fixtures as the solution and start treating them as the foundation. A ceiling light sets the baseline. Everything else builds the room.
I spent years in homes where the only light came from a single ceiling fixture in each room. The spaces felt functional but never comfortable. The shift happened when I added a floor lamp to a corner and a small table lamp near a reading chair. The room did not just look better. It felt different. That is the effect layered lighting produces, and no amount of expensive fixtures achieves it without the layering principle underneath.
The other lesson that took longer to learn: quality LED bulbs matter. Cheap bulbs flicker, shift color over time, and fail faster than their packaging suggests. Spending a little more on reputable LED bulbs with accurate color temperature ratings pays back in longevity and consistency. The color temperature printed on the box should match what you actually want in the room. Test one bulb before buying a full set.
Safety is non-negotiable. I have seen homeowners skip the voltage tester step and get away with it. I have also seen the consequences when they did not. A $15 tester and two minutes of verification are not optional steps. They are the steps that make everything else possible.
Tailor your lighting to how you actually use each room. A home office needs strong task light and cooler color temperatures. A bedroom needs warmth and dimmability. A kitchen needs both. No single setup works everywhere, and that is exactly why this process is worth doing room by room.
— Enn
Newwayref has the fixtures and bulbs for your next upgrade
Ready to put this guide into practice? Newwayref carries a thoughtfully curated selection of lighting fixtures, LED bulbs, and home decor that fits every room and budget.

From modern pendant lights to energy-efficient LED options, the Newwayref lighting collection makes it straightforward to find fixtures that match your style and your layering plan. Free shipping applies on orders over $50, so you can stock up on bulbs, add a floor lamp, and pick up a wall sconce in a single order. Browse the full range at Newwayref and find the pieces that bring your lighting upgrade to life.
FAQ
What is layered lighting in a home?
Layered lighting combines ambient, task, and accent light sources in a single room to create depth, warmth, and functionality. Interior designers recommend at least 2–3 distinct sources per room for a balanced result.
How much can I save by switching to LED bulbs?
Switching to LED lighting saves an average of $225 per year on energy costs, according to the U.S. Department of Energy. LEDs also last significantly longer than incandescent bulbs, reducing replacement frequency.
What color temperature is best for living rooms?
A color temperature of 2700–3000K produces a warm, welcoming glow suited to living rooms and bedrooms. Lights above 3000K can feel harsh or clinical in residential spaces.
Do I need an electrician to upgrade my home lighting?
Simple bulb swaps and basic fixture replacements are DIY-safe. Wiring changes, circuit alterations, and smart switch installations require a licensed electrician to meet safety and building code requirements.
Why do my LED bulbs flicker after installation?
Flickering usually means the LED bulb is paired with an incompatible dimmer or the wrong fixture base type. Replace the dimmer with an LED-rated model and confirm the bulb base matches the socket to resolve the issue.